Canvas Installation Guide
Introduction
Recently, BioSig-ID created an additional app that reduces the manual processes of creating guarded quizzes and tool instances. This app will allow you to efficiently create guarded quizzes, tool instances and instructions within your courses. To take this new app for a spin, try it out on the BioSig-ID Admin demo page . (This is not attached to a Canvas instance and no actual course is being adjusted)
For those clients who are already using the Guarded Quiz and Tool Instance apps, you can skip to Step 4 to install the BioSig-ID Admin App. If you are new to BioSig-ID, please follow all of the steps below to begin using BioSig-ID in your courses.
UPDATE NOTICE
Canvas Account Settings
Step 1: Create Developer Keys
Switch to "Admin View"
Admin > Select the account to manage > Developer Keys
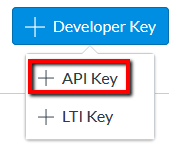
Use the +Add Developer Key button, followed by the " + API Key " selection
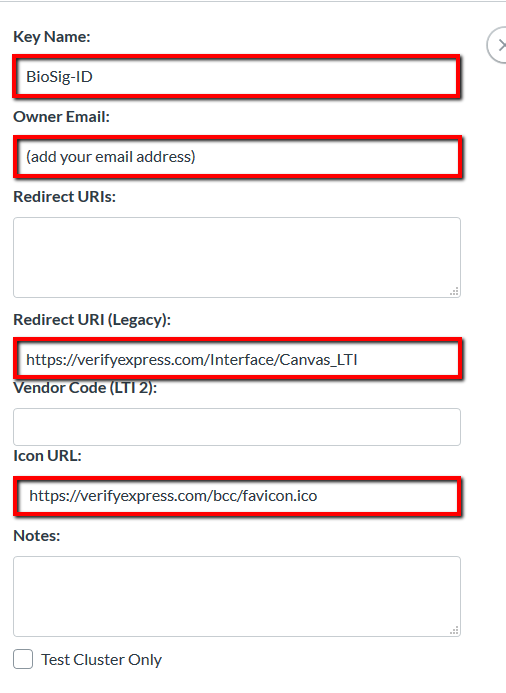
Description | Value |
| Key Name | BioSig-ID™ |
| Owner Email | (add your email address) |
Redirect URIs | (leave blank) |
Redirect URI (Legacy) | Production = https://verifyexpress.com/Interface/Canvas_LTI |
Vendor Code (LTI 2) | (leave blank) |
Icon URL | Production = https://verifyexpress.com/bcc/favicon.ico |
Notes | (leave blank) |
Test Cluster Only | (keep checkbox unchecked) |
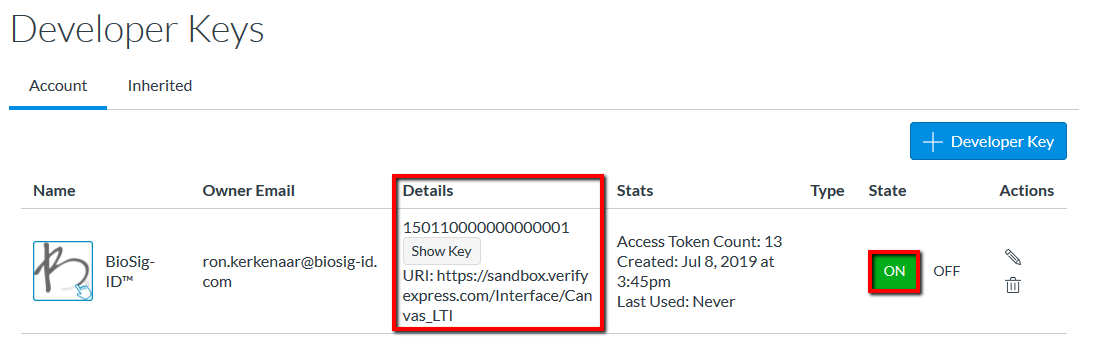
Next, you will provide the " ID: " and " Key: " values to BSI to allow the API integration to become fully functional. The State should be set to "ON"
The ID is right above Show Key button, copy this information to provide to BioSig-ID.
Click Show Key and copy this information to provide to BioSig-ID.
Enforced Scope Policies
- url:GET|/api/v1/accounts
- url:GET|/api/v1/accounts/:account_id/courses
- url:GET|/api/v1/accounts/:account_id/sub_accounts
- url:GET|/api/v1/accounts/:account_id/permissions
- url:GET|/api/v1/courses/:course_id/assignment_groups
- url:POST|/api/v1/courses/:course_id/assignment_groups
- url:GET|/api/v1/courses/:course_id/assignments
- url:POST|/api/v1/courses/:course_id/assignments
- url:GET|/api/v1/courses/:course_id/modules
- url:GET|/api/v1/courses/:course_id/modules/:id
- url:POST|/api/v1/courses/:course_id/modules
- url:PUT|/api/v1/courses/:course_id/modules/:id
- url:GET|/api/v1/courses/:course_id/modules/:module_id/items
- url:GET|/api/v1/courses/:course_id/modules/:module_id/items/:id
- url:GET|/api/v1/courses/:course_id/module_item_sequence
- url:POST|/api/v1/courses/:course_id/modules/:module_id/items
- url:PUT|/api/v1/courses/:course_id/modules/:module_id/items/:id
- url:DELETE|/api/v1/courses/:course_id/modules/:module_id/items/:id
- url:POST|/api/v1/courses/:course_id/pages
- url:GET|/api/v1/courses/:course_id/quizzes
- url:POST|/api/v1/courses/:course_id/quizzes
- url:GET|/api/v1/courses/:course_id/quizzes/:id
- url:PUT|/api/v1/courses/:course_id/quizzes/:id
- url:POST|/api/v1/courses/:course_id/quizzes/:quiz_id/questions
- url:GET|/api/v1/courses/:course_id/tabs
- url:PUT|/api/v1/courses/:course_id/tabs/:tab_id
- url:GET|/api/v1/accounts/:account_id/terms
Step 2: Add the Guarded Quiz Intercept App
Admin -> "Settings" -> "Apps" tab
Description | Value |
Name | BioSig-ID™ Guarded Quiz |
Consumer Key | (This will be provided by BSI} |
Shared Secret | (This will be provided by BSI) |
Config URL | Production = https://verifyexpress.com/interface/quiz.xml |
Then use the " Submit " button.
Step 3: Add the Tool Instance App
Admin -> "Settings" -> "Apps" tab
Description | Value |
| Name | BioSig-ID™ |
Consumer key | (Same key as the one from the steps above) |
Shared Secret | ( Same secret as the one from the steps above ) |
Config URL | Production = https://verifyexpress.com/interface/canvas.xml |
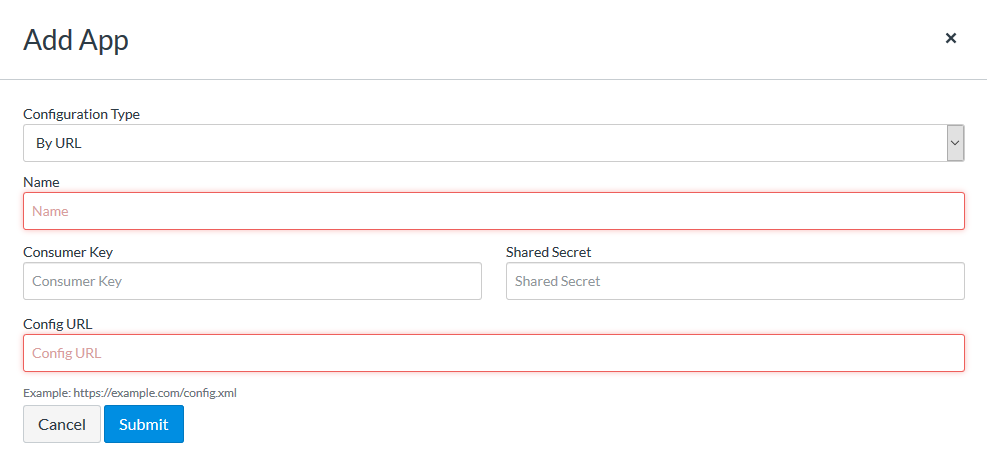 Add App form
Step 4: Add the BioSig-ID™ Admin App
Admin -> "Settings" -> "Apps" tab
Description | Value |
| Name | BioSig-ID™ Admin |
Consumer Key | (Same key as the one from the steps above) |
Shared Secret | (Same key as the one from the steps above) |
Config URL (on) | Production (Teachers, TAs, Designers and account admins) = https://verifyexpress.com/interface/admin_on.xml Production (Account admins only) = https://verifyexpress.com/interface/admin_only_on.xml |
Config URL (off) | Production (Teachers, TAs, Designers and account admins) = https://verifyexpress.com/interface/admin.xml Production (Account admins only) = https://verifyexpress.com/interface/admin_only.xml |
Use the "Yes, Install Tool" button when Canvas indicates that the tool has already been installed in this context.
UPDATE: For Apple Safari, or other browsers with a restrictive server session-cookie policy, an empty API-domain error might occur. The error message will contain multiple solutions, including a way to temporarily set a cookie in a new tab, but to fix that permanently the following configuration files allow the Canvas Admin App to always be opened in a new tab:
Sandbox |
|
Production |
|
Then use the "Submit" button.
NOTE: The difference between (on) and (off) is the default
availability status of the course navigation menu item. Unless
BioSig-ID™ is used in all Canvas courses then it might be wise to use
the (off) method and manually drag-and-drop the "Navigation" menu item
per course to make it available.
Recommendations
For BioSig-ID™ Guarded Quizzes to be effective the direct access to
Quizzes needs to be disabled. This can be done automatically via the Admin: BioSig-ID™ Admin App with the respective checkbox option, but it can also be done manually as follows:
Admin -> Courses -> select a course that will use BioSig-ID™ -> "Settings" -> "Navigation" tab
Drag 'Quizzes' to the hide section:
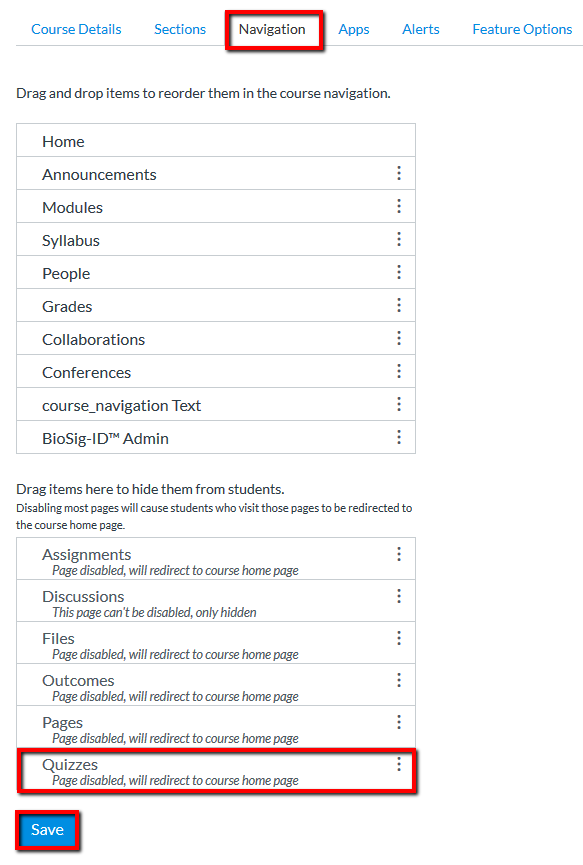
Use the "Save" button.
NOTE: BioSig-ID™ Guarded Quiz links need to be re-created on any
course copy. Please use the BioSig-ID™ Admin system to fix these links
quick and easy, or manually recreate them one at a time.
How to Use the Admin Tool
Watch this quick video for an overview of how to use the BioSig-ID™
Admin Tool to quickly add tool instances and guarded quizzes to any
course.
Related Articles
B2 Installation Guide
Introduction The Biometric Signature ID (BSI) Building Block for Blackboard Learn 9.1 provides a mechanism to require a user/student to validate their identity when needed. This process is split between enrollment for the user to create their initial ...LTI 1.3 Installation Guide
The LTI 1.3/Advantage-Proctoring solution relies on the Ultra Extended Framework which only works on Ultra View courses in a Blackboard Ultra Navigation environment. That means access to the Admin section is achieved by the left-sided menu item that ...Canvas course issue detected
If end-users report seeing the following error: Then please use the BioSig-ID™ Admin app to fix the quiz-links on this copied course. Admins with enough access can do this for a term, or the entire Canvas instance.Moodle Installation (Module)
Introduction ATTENTION: Moodle 3.10+ requires BioSig-ID™ Moodle module v2020122400 or higher. The BioSig-ID™ Module for Moodle provides a mechanism by which a user may be redirected to BSI's BioSig-ID™ Identity verification system and the ...Canvas BioSig-ID Admin App
Getting Started Click on BioSig-ID™ Admin tool in the Course Navigation menu. Click Authorize to allow BioSig-ID™ access to your course. This is a one time action. BioSig-ID Admin App Location If the Admin App is not available, please contact your ...