Adding BioSig-ID to Your Course(s)
Introduction
The Biometric Signature ID (BSI) Building Block for Blackboard Learn 9.1 provides a mechanism to require a user/student to validate their identity when needed. This process is split between enrollment for the user to create their initial profile, and subsequent times when they need to validate themselves. Validating can be configured for three scenarios. Before a course can be opened, right after the “Begin Quiz” button is clicked, or as any other content item via adaptive release conditions.
Activating BioSig-ID
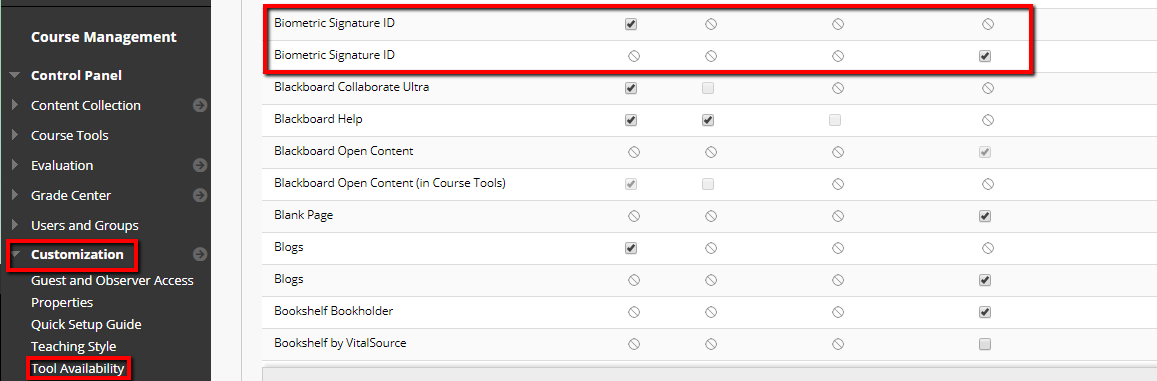
The Blackboard system administrator might not have activated the BioSig-ID building block by default.
This can be verified by looking at the “Tools” drop-down menu to see
if “Biometric Signature ID” is listed near the bottom. To adjust the
availability at course level the following steps can be used:
- On the left side menu in the Course Management section expand the Customization entry
- Select the Tool Availability option
- Locate the Biometric Signature ID entries and activate their respective checkbox options as desired.
Introduction & Enrollment
For detailed instructions on how to create enrollment instructions in
your course please communicate with your BSI contact or consult: Blackboard Learn (Enrollment Instructions)
The enrollment instructions can be adapted to fit your institution's
needs. Please feel free to modify the word or other aspects. It is
advisable to add the enrollment process in a place easy for your
users/students to find.
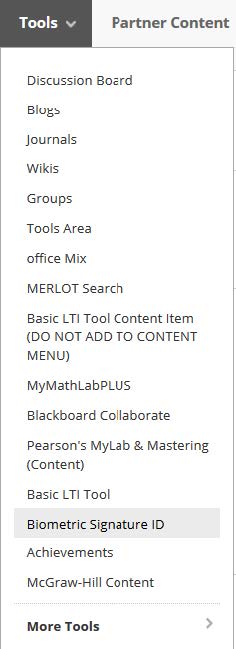
Creating the enrollment link within Blackboard is easy as adding a course instance. From the Tools menu drop down, Choose Biometric Signature ID .
Validating Identity
There are three methods available to request a student to validate their BioSig-ID password.
- Adaptive release on any Blackboard course content item using a grade column
- Course Intercept
- Quiz Intercept
Each method will be explained in separate detail. The recommended
method is to use Quiz Intercept by itself or in conjunction with the
other methods.
Adaptive Release (AKA: Tool Instance)
Any Blackboard course content item that has support for adaptive
release conditions can be configured to be "gated" by a BioSig-ID
validation. This is easily added using the same method we used
previously to add the enrollment/practice validation.
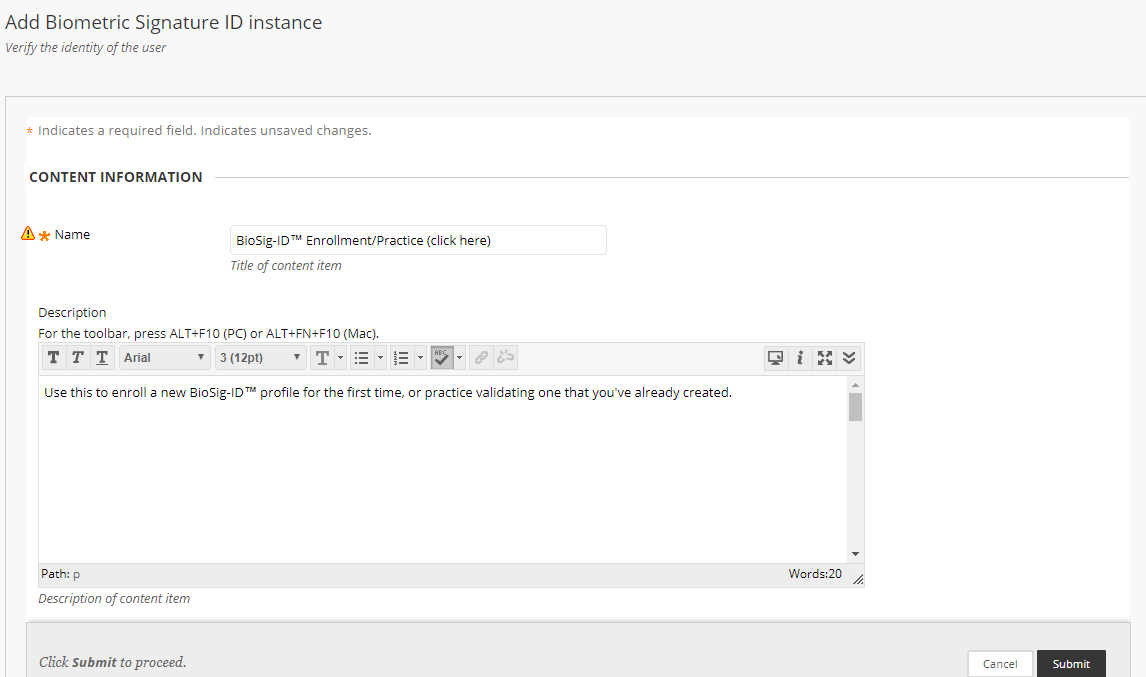
- Using the Tool menu, select Biometric Signature ID
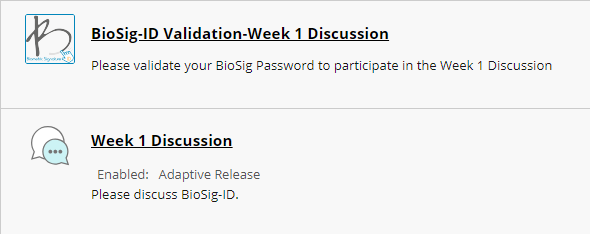
- Name the instance a descriptive name so that it references the item
you are gating. For example, if you are gating Week 1 Discussion, you
would want to name this instance "BioSig-ID Validation-Week 1
Discussion.
- Provide a good description that explains what the user/student must
do to open the item. For example, "Please validate your BioSig-ID to
access the Week 1 Discussion"
- Click Submit
- Drag the instance you just created to a position directly above the item it is "gating"
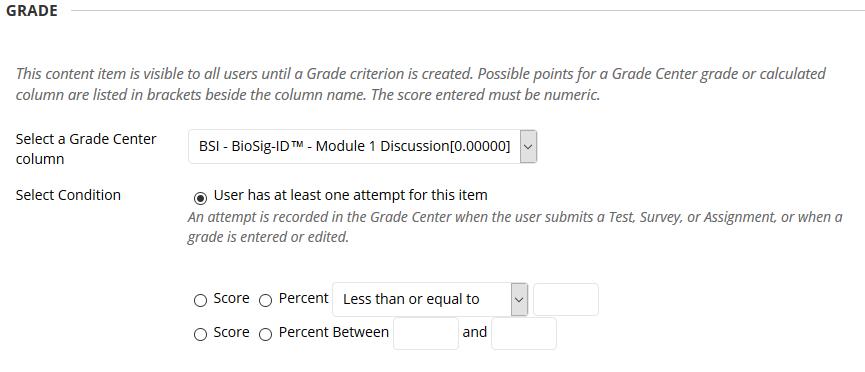
In the previous sets we created the tool instance to "gate" an item. Now we need to set the adaptive release conditions.
- Click the chevron next to the item you are gating.
- Select Adaptive Release
- Scroll to the Grade area
- In the Select a Grade Center column , use the drop down menu to locate the corresponding BioSig-ID instance that you created
- Selection Condition select the radio button for User had at least one attempt for this item
- Click Submit
Note: If the instructor has dates of
availability set and the student completes the BioSig-ID validation
prior to the display date, they will not be able to access the item even
if they validate successfully. Likewise, if the user/student
validates successfully when the item is no longer available they will
not see the item.
The result will look like:
Course Intercept
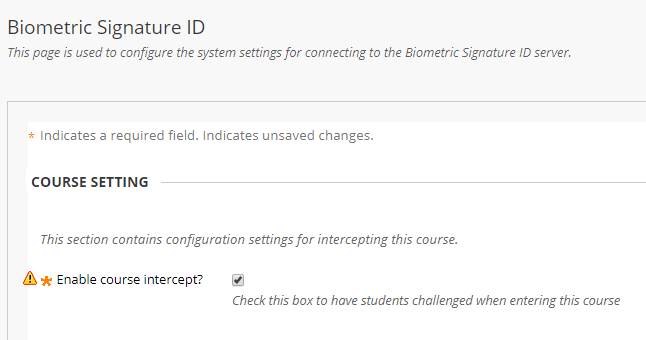
To make the course only accessible after a successful BioSig-ID you may follow these steps:
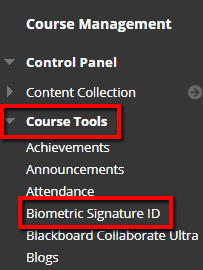
- Under Course Management section expand the Course Tools entry
- Select the Biometric Signature ID option
- Select the checkbox for Enable Course Intercept
- Click the Submit button
Quiz Intercept
It is very easy to activate BioSig-ID for a quiz or any other item
that is supported. Click the Chevron next to the quiz item to see if it
is currently intercepted. If (Disabled) shows next to BioSig-ID options then the quiz is not intercepted. If (Enabled) shows next to BioSig-ID options then the quiz will be intercepted and the user will be required to validate prior to accessing the assessment.
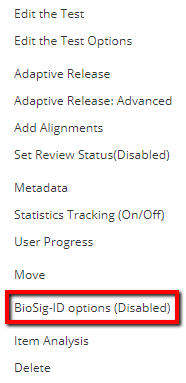 | 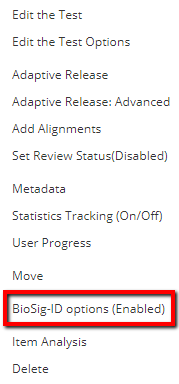 |
Changing the status of a quiz intercept is as easy as clicking on the Chevron and toggling between the two options.
Quizzes can also be "gated" by adaptive release or the course
intercept options. However, it is important to not burden the student
with too many validation requests. Usually once a day or weekly is more
than sufficient.
Please consult your institution's policy on the recommended guidelines for BioSig-ID validations.
Converting from Adaptive Release to Quiz Intercept is easy. Simply
delete the BioSig-ID instance attached to adaptive release and activate
the Quiz Intercept (Enabled).
Related Articles
Adding BioSig-ID™ to Your Ultra Course(s)
The Biometric Signature ID (BSI) LTI 1.3/Advantage integration for Blackboard Learn Ultra View courses provides a mechanism to require a user/student to validate their identity when needed. This process is split between enrollment for the user to ...Adding BioSig-ID to a Schoology Course
This article will show you how to easily add a BioSig-ID™ validation inside a Schoology course. BioSig-ID validations can be placed within the course prior to items such as discussion boards, quizzes or assignments. If you need additional ...Adding BioSig-ID to a Course in Jenzabar
A BioSig-ID™ validation can be placed before any content item where "rules" can be used. This will require a user to validate successfully prior to accessing the content item. Creating a Tool Instance To add a BioSig-ID validation you will first ...Adding BioSig-ID to Moodle Courses
Introduction Instructors create an instance of the module in their course and use its associated grade book column to give students access to one or more other content items (such as an assignment). Creating a Tool instance Add a tool instance of the ...Canvas BioSig-ID Admin App
Getting Started Click on BioSig-ID™ Admin tool in the Course Navigation menu. Click Authorize to allow BioSig-ID™ access to your course. This is a one time action. BioSig-ID Admin App Location If the Admin App is not available, please contact your ...